27 Aug 2015

A little bit about lemon coconut slice


One of my favorite flavors is lemon. I love lemon cheesecake, lemon water, iced lemon tea... Sometimes when I crave something sweet but not too sweet I look for lemon recipes.

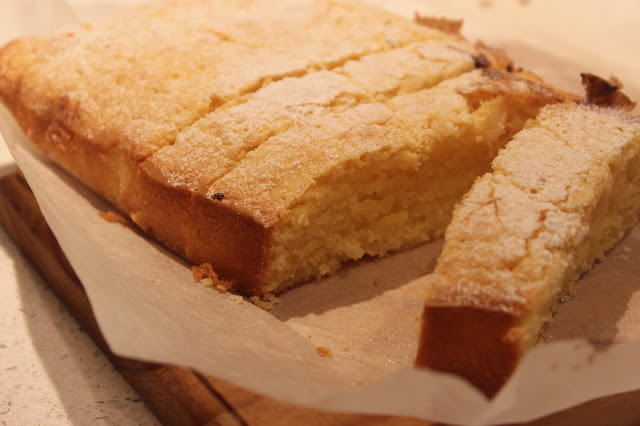
This time it's a lemon coconut bar.

This is quite possibly the easiest baking recipe, even a kid can do it.

It's almost like a cake, which makes it dessert appropriate too. I think it would be perfect eaten with natural/ greek yogurt- the tang would counteract the sweetness of this slice.

A slice with tea would also make the perfect tea time treat.
Cut it up into cubes and serve it on a high tea platter.
Or larger squares for a bake sale.
I actually halved the recipe posted below but didn't have a tin small enough. So I used my ingenuity and held up the sides with ceramic ramekins :P It worked fine!

I think this lemon coconut bar perfect for those times when you have to bring a dessert or plate to share and you don't have a lot of energy to prepare a cheesecake or cupcakes.
Mix everything in one bowl and while it's baking for half an hour you can get ready for your event. Take it out of the oven and it will cool slightly in the car. By the time you get there it'll be the perect temperature to eat warm!


LEMON and COCONUT BARS
250 gr butter
2 cups caster sugar
4 eggs
1½ cups plain flour
1 cup desiccated coconut
The juice and rind of 2 lemons
Icing sugar to dust

1. In a bowl, melt the butter in the microwave
2. Mix in sugar
3. Add in eggs, one at a time until mixture is glossy
4. Sift in flour and mix well together
5. Add coconut, grated lemon rind and lemon juice
6. Bake at 180C for 30 mins. Test with skewer
7. Let cool and dust with icing sugar


It will keep in an airtight container for 3 days.


And to conclude,

my bffe got married and I got to be her bridesmaid :) We did our own makeup!!!

Signed,

Elisa

22 Aug 2015

A little bit about panna cotta

Panna cotta is an Italian dessert made with cream and gelatine. It's no-bake and is set in the fridge for 4 hours.
'Panna cotta' means cooked cream. It's simple really, you cook the cream, sugar, vanilla and gelatin and serve with a simple sauce; berry, caramel or as I did; espresso.
I was surprised at how easy it is. The hardest thing was taking it out of its moulds.

This is another Donna Hay recipe; you know what that means! It's foolproof.

It requires one vanilla bean. When I was in Farro's looking for vanilla beans I was surprised at how expensive they are. $15 for a pack of 3. That's $5 for a single bean.
Luckily I have generous friends... Miss Shell kindly gave me one of hers in exchange for the final product.
Split the vanilla bean lengthwise through the middle with a sharp knife.
Then run the knife through the middle to scrape the seeds out.
Get every single bit of seed out; that stuff is expensive.
I used powdered gelatine. There are other recipes that use sheet gelatine.
Sprinkle the gelatine over a bowl of water. After 5 minutes, the water should be absorbed and you're left with a semi-hard lump that will hold your panna cotta in shape.
In a saucepan goes the cream, icing sugar and vanilla seeds.
Bring to the boil and stir. Add the gelatine and stir until it is dissolved.
I used tea cups as moulds. This nautical teacup I got from Lauren is the perfect size because the panna cotta is quite rich so you only want a few spoonfuls. The bigger plain teacup was better for sharing in my opinion.
This recipe filled five tea cups. I think 6 would have been better- split up some of the bigger portions.

In the fridge it goes for 4 hours or overnight.
To take them out of the moulds, fill a bowl with WARM (not hot) water and let the panna cotta sit for 10 seconds. Put a plate on top, invert and give a little shake. When you hear the 'plop', that's when you know the panna cotta has come out. Use a teaspoon or small rubber spatula to loosen the edges if you have to.
Remember what I said about using WARM water! Don't leave it in there for too long or the cream will melt!
Fail.
For the espresso sauce, make a cup of strong black coffee. Pour in a saucepan with white sugar and bring to the boil.


This is the recipe from Donna Hay's 'A Cook's Guide' cookbook.

Panna cotta
2 Tbsp water
2 tsp gelatine powder
500ml cream
1/3 cup icing sugar
1 vanilla bean, split and seeds scraped

1. Place the water in a bowl and sprinkle the gelatine evenly on top. Leave for 5 minutes or until hardened.
2. Pour the cream, sugar and vanilla in a saucepan over medium heat and bring to the boil, stirring occasionally. Add the gelatine and cook, stirring, for 1-2 minutes or until gelatine is dissolved.
3. Pour into moulds and refrigerate for at least 4 hours.
4. Let the panna cotta moulds sit in a bowl of warm water for a few seconds before inverting onto a plate.


Espresso sauce
2 Tbsp instant coffee powder
200ml hot water
1/3 cup white sugar

1. Dissolve the coffee in hot water
2. In a saucepan over medium heat, stir together the coffee and sugar. Bring to the boil for 5-8 minutes until thickened and syrupy.
3. Refrigerate until cold.

I love the black dots from the vanilla. You can use paste instead of seeds, but the dots make it look more fancy.

There are a lot of panna cotta variations. In the cookbook, Donna Hay also has passionfruit jelly panna cotta, chocolate, brown sugar with espresso and cinnamon and rhubarb. I think next time I will use some coffee liquor. 

The espresso sauce turned out quite nice. It complimented the creamy panna cotta and it wasn't too sweet. Still- it's a rich dessert. 
But amazingly simple and easy to make. Will definitely impress your next dinner guests.


And to conclude,

Have I told you about a little gem called Ponsonby Central?
I can't believe I've only recently discovered it!
It has a market place at the back that sells fruits, veges...
wine...
Cheese...
And my favorite place (the only reason I go there) Crepes-a-gogo!
This is the cream cheese, sundried tomato and mushroom.
But my favorite is the 'Croque monsieur'- ham, cheese and bechamel sauce.
Get 10% off with your student ID!
This is the other place I want to try. They sell ice cream sandwiches!! Choose your cookies and scoop of ice cream!
Have you been here? What flavors do you recommend?

Signed,

Elisa


25 Jul 2015

A little bit about comfort food: macaroni and cheese


This is Jamie Oliver's recipe for the classic mac and cheese in which he uses bay leaves and worchestershire sauce. I thought it sounded quite interesting so I gave it a go!


Quite simple, and you can add veges or meat to it according to your preference. I added a chopped up slice of leftover roast beef from dinner. I thought I had breadcrumbs but didn't, so I just went with a parmesan cheese topping.


Macaroni and Cheese

Pasta, doesn't have to be macaroni
20 gr butter
1 Tbsp flour
2 cloves garlic, peeled and finely sliced
1 bay leaf
1 cup milk
Grated cheese
Thyme
Worchestershire sauce
1/2 tsp nutmeg
Breadcrumbs
Parmesan cheese

1. Boil the pasta.
2. In a saucepan over low heat, melt the butter.
3. Add the flour and stir until it forms a paste.
4. Add the finely sliced garlic and bay leaf.
5. Whisk in the milk a little at a time. 
6. Bring the sauce to a boil, until it thickens. You want it to be slightly on the watery side because it will thicken up more in the oven.
7. Take the pan off the heat and remove the bay leaf. Add as much grated cheese as you like and melt it in.
8. Add thyme and nutmeg, season it well and add a splash of worchestershire sauce.
9. Pour into an ovenproof dish, sprinkle breadcrumbs and parmesan cheese over top.
10. Bake at 220 C for 20 minutes.

I modified the recipe so it serves 2. Or actually 1 cause it was delicious.
Comfort food.


And to conclude,

If, in your teenage years you read all 4 books of The Sisterhood of the Travelling Pants, the you must. must. read this final one. It is happy. And it is sad.

Signed,

Elisa

12 Jul 2015

How to: icing

I made a whole bunch of mini cupcakes for my friend's wedding afternoon tea.
Thank you Rachel for asking me to bake for your special day! What a privilege.

I've learnt some icing tips and techniques from YouTube- the best school in the world. That's where I learn how to cook, bake, decorate cakes, put on makeup, what fashion is trending etc.
I have this Wilton icing tip set from my auntie. In the middle is the nozzle which you attach to the outside of the piping bag so you can use the same icing bag and change nozzles easily. Brilliant, cause I used one type of icing and five different nozzles.
Here are the ones I used
 Tip numbers from left to right: 7, 97, 106, 101 and 76
And this is the pattern each nozzle makes! Which one is your favorite?
Mine is the rose petals 2nd from right, using tip #101. It takes the longest to do, but you can agree that the result looks intricately beautiful. I think next time I will use two different color icing and give it an ombre effect.

To make the spiral on the leftmost, use a circular tip and pipe from the center outwards, making sure you hold the piping bag vertically.

You can achieve two different effects with the squiggly #97 tip, as seen in the photo. You can start from the centre and use one circular motion to cover the entire cupcake OR you can start from the centre and make a circle one by one going outwards each time.

To make the roses, hold the piping bag so that the fatter end of tip #101 is touching the cupcake. Make a single petal by sweeping in a half circle motion, going around the cupcake starting from the centre.

Finally, the cupcake on the most right is achieved by starting from the centre and going outwards in a circular motion.


The recipe for the buttercream (thanks Reenu) and the cupcakes is in this past blogpost

Buttercream Icing

100g butter (room temp)
1 1/2 cups icing sugar, sifted
1/2 tsp vanilla
1 Tbsp milk

1. Beat butter until pale and fluffy.
2. Add icing sugar and vanilla essence and mix again.
3. Add milk according to the consistency you require.
4. Beat for another 2-3 minutes

Note: The more you beat the paler the icing gets. Mine was still quite yellow, you can beat it for longer or even add coloring.

Add some embellishments like silver cachous and these premade flowers for extra cuteness.


And to conclude,

Worry is imagining life without God.

If you believe in a God that controls everything, a God that is faithful, a God that loves you unconditionally and has the best plan for you... Why are you worried?

Signed,

Elisa

4 Jul 2015

A little bit about chilli and cornbread

To commemorate America's Independence Day, I made (what I think is) an American meal.


The chilli recipe is adapted from Jamie Oliver's video. For my own I made it not spicy, but you can make it as spicy as you like with different Mexican chilli beans and adding chopped chilli. I found a pack of roasted spicy chicken thighs, so I broke it up into pieces and used it in this recipe.

It serves 2 for those of you who, like me this week, are cooking meals just for themselves.


One pot chilli

Olive oil, for frying
1 small carrot
1 celery stick
1/3 red onion
1/2 capsicum (I used a mixture of red, yellow/ orange)
Roasted chicken, broken up into pieces
1/2 can tomatoes
1/2 can chickpeas
1/2 can Mexican chilli beans
Spices: cumin, coriander, smoked capsicum
Salt and pepper

1. Chop vegetables into small cubes.
2. Heat a few tablespoons of olive oil in a pot.
3. Add chopped veges and fry until oil is absorbed.
4. Add chicken and continue frying.
5. Pour in canned tomatoes, chickpeas, chilli beans (add half a cup of water if necessary).
6. Stir and season with spices and salt and pepper.
7. Simmer for 45 minutes, stirring occassionally.


I've experimented and served this three delicious ways; 
1. with brown rice,
2. on a toasted bun spread with cream cheese,
3. with cornbread, recipe below.

I have to say the cream cheese toasted bun with chilli is surprisingly delicious and is my favorite way of eating this chilli.

Cornbread

1/2 cup cornmeal
1/2 cup plain flour
1/2 Tbsp baking powder
1 1/2 Tbsp raw sugar
1 egg
1/2 cup milk
1/8 cup (30 ml) vegetable oil, I used rice bran oil

1. Mix all the dry ingredients together.
2. Add egg, milk and oil and whisk together until there are no lumps.
3. Grease an overproof dish with butter.
4. Bake at 180C for 15 minutes. The cornbread should have risen with little cracks on the top.

Serve with chilli, soup or eat by itself with a little butter.


And to conclude,

I am actually making a trip to LA this November with my family. Let me know of any must-dos there!

Signed,

Elisa